Keeping your Plesk server secure is an important steps to take before you start putting any production websites to the server. This ensures all the security aspects of the server is taken care.
Let’s hop into the 12 simple ways you can setup and secure your Plesk Server.
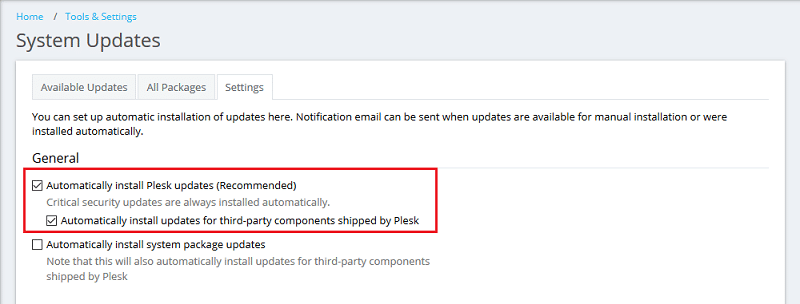
Steps 1 – Keep Your Plesk Updated
By default, Plesk installs updates automatically be means of the Plesk daily task (executed every night), if the option Automatically install Plesk updates is enabled at Tools & Settings > Update and Upgrade Settings.
Steps 2 – Define Your Password Strengh Policy
Password strength is a measure of a password’s resistance against guessing or brute-force attacks. The strength of a password depends on its length, complexity, and unpredictability. You can make your server more resistant to brute-force attacks by changing the default password strength policy.
When configuring the password strength policy in Plesk, you can choose from five password strength levels, ranging from “Very weak” to “Very strong”. Changing the password strength policy to a stricter one increases the minimum password length, and also makes it mandatory to use different types of characters in passwords (upper- and lowercase characters, digits, and special characters). Whenever a Plesk user sets a new password or changes an existing one, they are required to adjust the password until it meets the requirements of the password strength policy currently in effect.
By default, the password strength policy is set to “Very Weak”. Selecting a stricter password strength policy makes Plesk users employ strong passwords. Such passwords are more secure, but are harder to remember.
The password strength policy is applied to the following Plesk passwords:
- Passwords used to log in to Plesk.
- Subscription system users’ passwords.
- Database users’ passwords.
- Mailbox passwords.
To change the password strength policy for Plesk users:
- Go to Tools & Settings > Security Policy (under “Security”), and then scroll down to the “Password strength” section.
- Under “Minimum password strength”, select the radio button corresponding to the desired password strength policy.
- Click OK.

Steps 3 – Block of unused ports with Firewall
Use the firewall available on your server to only allow ports and services that’s running on your server. To access this the firewall configuration in Plesk, access it via Plesk > Tools & Settings > Security – Firewall
Below is the common ports used by Plesk services.
20 ftp-data (TCP)
21 ftp (TCP)
22 ssh (TCP)
25 smtp (TCP)
53 dns (TCP and UDP)
80 http (Web server and Plesk updater) (TCP)
106 poppassd (for localhost only) (TCP)
110 pop3 (TCP)
113 auth (TCP)
143 imap (TCP)
443 https (TCP)
465 smtps (TCP)
587 mail message submission (TCP)
953 rndc (TCP)
990 ftps (TCP)
993 imaps (TCP)
995 pop3s (TCP)
1433 mssql (TCP) – Windows Only
3306 mysql (TCP)
3389 rdp (TCP) – Windows Only
5224 (outgoing connections only) plesk-license-update (TCP)
5432 postgres (TCP) – Linux Only
8401 sqladmin (TCP) – Windows Only
8443 plesk-https (TCP)
8447 autoinstaller (TCP)
8880 plesk-http (TCP)
12768 psa-pc-remote (for localhost only) (TCP) – Linux only, Postfix
135, 139, 445 (TCP) ports for migration – Windows Only
137, 138 (UPD) ports for migration – Windows Only
10155 (TCP) for a custom Plesk Migrator service performing miscellaneous tasks – Windows Only
10156 (TCP) for rsync server (migration) – Windows Only
49152-65535 (TCP) for passive mode (incoming connections only)
A common attack being hit is the brute force attacks to the SSH port (Linux OS) and Remote Desktop (Windows).
To change the SSH listening port:
- Login to your server’s SSH as root
- Edit the file /etc/ssh/sshd_config
- On the first few top lines on the sshd_config, you will see port 22 has been commented.
- Remove the # and change the port 22 to a random port as your preferences – except any ports listed as above for services used by Plesk. Example you can change is to 1122, 2233..etc
- Save the file.
- Restart the SSH services by issuing the command “service sshd restart”
- Update your firewall rules to allow this port – IMPORTANT or else you will be locked out from being able to access your server SSH.

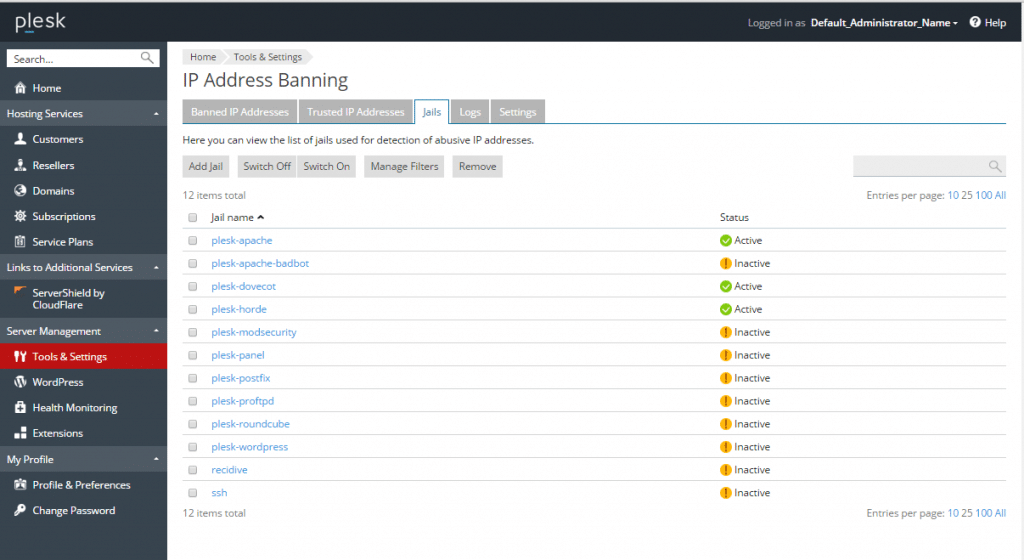
Step 4 – Protect Your Server from Brute Force Attacks with Fail2ban
Fail2Ban is an automated way to protect your server from brute force attacks. It monitors server log files for patterns corresponding to authentication failures, seeking for exploits, and other entries that can be considered suspicious. Such log entries are counted, and, when their number reaches some predefined value, Fail2Ban either sends a notification email or bans the attacker’s IP for a pre-defined length of time.
Fail2Ban should be installed as a Plesk component (see Plesk Components for the details). You can configure the Fail2Ban settings via the Plesk graphical user interface, at Tools & Settings >IP Address Banning.
Here, you can do the following:
- Create a filter that will be used to search the logs for suspicious activity. The filter is a set of one or more regular expressions.
- Create a jail, which is a set of rules covering an individual scenario. The settings of the jail determine what is to be done once an attack is detected according to a predefined filter.
- Activate or deactivate a jail.
- Specify trusted IP addresses, i.e., the IP addresses that will never be banned.
- Configure the settings of IP address banning, such as ban period, a time interval for detection of subsequent attacks, a number of failures before an IP address is banned.
- View the list of banned IP addresses and unban them if necessary.
Plesk already provides a number of pre-configured jails and filters for all hosting services (web server, mail server, FTP server). However, you can configure your own jail and filter according to your needs.
Steps 5 – Secure Your Mail Server With SSL
SSL/TLS certificates protect sensitive data by encrypting connections between the client and the server. Moreover, having a valid SSL/TLS certificate is practically a requirement on today’s Internet. To improve security and give your customers peace of mind, we strongly recommend protecting Plesk and the Plesk mail server with SSL/TLS certificates. This topic explains how to secure both Plesk and the Plesk mail server with a free SSL/TLS certificate from Let’s Encrypt, an SSL/TLS certificate purchased from a certificate authority, or a self-signed SSL/TLS certificate.
During installation, both Plesk and the Plesk mail server are automatically secured with a free self-signed SSL/TLS certificate. This allows for encrypting connections to Plesk and the Plesk mail server so that, for example, passwords could not be intercepted in transit. However, self-signed SSL/TLS certificates come with a drawback. Anyone visiting a Plesk server secured with a self-signed SSL/TLS certificate is shown a warning telling them that the website is not trusted, which may cause concern. To avoid this, we recommend securing Plesk and the Plesk mail server with either a free SSL/TLS certificate from Let’s Encrypt or an SSL/TLS certificate purchased from a certificate authority.
Important notes: If you secure the Plesk mail server with an SSL/TLS certificate, make sure to use the domain name for which the certificate was issued when connecting to the mail server, and advise your customers to do the same. Otherwise, the mail client software may be unable to verify the mail server identity, which may cause issues when sending or receiving mail. A common way of doing this is to use your server’s hostname and issue the SSL for it. This will be a more general options for all your users to refer to when inserting the incoming/outgoing mail server.
Securing Plesk and the Mail Server With a Certificate From Let’s Encrypt
Let’s Encrypt is an open certificate authority providing free SSL/TLS certificates. You can easily secure both Plesk and the Plesk mail server with SSL/TLS certificates using the free Let’s Encrypt extension.
When you install or upgrade the Let’s Encrypt extension, if Plesk is secured with a self-signed certificate, the extension automatically replaces it with a valid SSL/TLS certificate from Let’s Encrypt. The extension does not automatically secure the Plesk mail server.
If you want to replace a valid certificate issued by a certificate authority with one from Let’s Encrypt, follow the steps below.
To secure Plesk and the mail server with a certificate from Let’s Encrypt:
- Install the Let’s Encrypt extension if it is not installed.
- Go to Tools & Settings > SSL/TLS Certificates (under “Security”).
- Click the + Let’s Encrypt button.
- Make sure that the email address in the “Email address” field is correct. This email address will be used to send important notifications.
- Click Install. At this stage, the certificate from Let’s Encrypt has been generated and used to secure Plesk automatically.
- To secure the mail server, click the [Change] link next to “Certificate for securing mail”.
- Select the “Lets Encrypt certificate (server pool)” from the drop-down list, and click OK.
Now both Plesk and the Plesk mail server are secured with the certificate from Let’s Encrypt.
Important Notes: In Plesk for Linux, when Let’s Encrypt replaces the default self-signed certificate, in Tools & Settings > SSL/TLS Certificates the name of the certificate used to secure Plesk is changed to “Lets Encrypt certificate”. In Plesk for Windows, the default certificate name is changed to “Lets Encrypt certificate” only after you reload the Tools & Settings > SSL/TLS Certificates web page in the browser.

Steps 6 – Secure Your FTP Server
To secure FTP connections to your server, Plesk supports the FTP Secure (FTPS, FTP-SSL/TLS) protocol. Plesk gives you the ability to allow secure, plain, or both secure and plain FTP connections to the server.
To configure the allowed FTP connections, go to Tools & Settings > Security Policy. We recommend that you only allow FTPS connections. Note that it is required to comply with the PCI DSS standard.
By default, Plesk supports explicit FTPS only. However, you can turn implicit FTPS on if you wish. See the FTP section of the Advanced Administration Guide for Linux, or the Switching On Implicit FTPS section of the Advanced Administration Guide for Windows for more details.
If you are using Plesk for Windows, you have the option to configure the FTPS policy separately for each IP address. To do so, go to Tools & Settings > Security Policy and select the Use custom FTPS policy per IP address option. After that, go to Tools & Settings > IP Addresses. Click the IP address for which you want to configure the FTPS policy and select the desired option under FTPS usage policy.
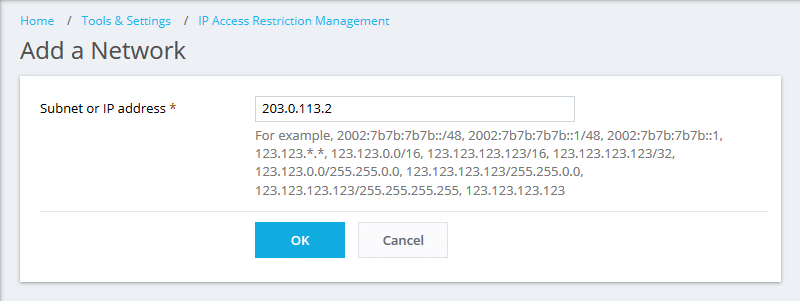
Steps 7 – Restrict IP to login via Plesk Admin
Your Plesk Admin user have the master access to all the configuration and domains on your server. Restricting the access is a good way to protect unauthorized access to your Plesk server to protect your data.
In Plesk, go to Tools & Settings > Restrict Administrative Access

Click Settings

Choose the option according to your needs and click OK:
- Allowed, excluding the networks in the list – Users, whose IP address is added to the list, will not be able to log in to Plesk as Plesk Administrator or Additional Plesk Administrator.
- Denied from the networks that are not listed – Only those users, whose IP addresses is added to the list, will be able to log in to Plesk as Plesk Administrator or Additional Plesk Administrator.

Click Add Network and add an IP address in accordance with the option above. The IP you are adding here must be a static IP that you are using. If your broadband Internet is changing always (dynamic IP), it is not recommended to use this. Consider signing up for VPN services which will get you a dedicated static IP or speak to your local broadband providers for a dedicated IP (extra cost might apply).
Step 8 – Restrict Remote Access to Plesk API
Plesk API is an interface you use to interact with Plesk. You can use it to remotely perform various operations in Plesk. For example, you can create customer accounts, delete subscriptions, and much more. However, an attacker can potentially use Plesk API for malicious purposes, for example, to gain control over your server. To protect against such attacks, we recommend restricting remote access via Plesk API.
In Plesk, you can either prohibit all connections via Plesk API (both XML API and REST API) or allow them only from trusted IP addresses.
To do so, you add the following entries to the panel.ini file.
- (Plesk for Linux)
/usr/local/psa/admin/conf/panel.ini - (Plesk for Windows)
%plesk_dir%\admin\conf\panel.ini
If the file is missing on your server, create an empty file at the specified location and name it panel.ini. You can also rename the panel.ini.sample file found in the same directory to panel.ini. This way, the file will contain a number of pre-configured settings you can use for reference.
To disable all connections via Plesk API, insert the following code to your panel.ini configuration.
[api]
enabled = off
To allow connections via Plesk API only from specific IP addresses. Where the allowedIPs setting accepts one or more IP addresses separated by commas or whitespace characters.
[api]
allowedIPs = IP_addresses
Important Notes: Do not add the whitespace character before or after the comma that separates several allowed IP addresses.
Step 9 – Enable Web Application Firewall (WAF) for your Web Server
In order to detect and prevent attacks against web applications, the web application firewall (ModSecurity) checks all requests to your web server and related responses from the server against its set of rules. If the check succeeds, the HTTP request is passed to website to retrieve the content. If the check fails, the predefined actions are performed.
ModSecurity is supported in both Plesk for Linux and for Windows. It works as a web server (Apache or IIS) module.
- Go to Tools & Settings > Web Application Firewall (ModSecurity) (in the Security group).
If you do not see this link, install the ModSecurity component in Tools & Settings > Updates and Upgrades > Add/Remove Components > Web hosting group.

2. Set the web application firewall mode to On or Detection only. Each incoming HTTP request and the related response will be checked against a set of rules. If the check succeeds, the HTTP request will be passed to web site to retrieve the content. If the check fails, the event will be logged. In the Detection only mode, no other actions will be performed. In the On mode, the HTTP response will be provided with an error code.
Important Notes: The web application firewall modes can be set on the server and domain levels. However, the domain level mode cannot be higher than the mode set for the server. For example, if the web application firewall is working in Detection only mode on the server level, you will not be able to turn it to On for domains. Only Off and Detection only modes will be shown.
3. Select the set of rules that will be checked by the web application firewall engine for each incoming HTTP request, or upload a custom rule set. You can select the following rule sets:
- Atomic Basic ModSecurity. A free starter version of the Atomic ModSecurity rules, bundled with Plesk. It contains important security features and bug fixes released on a monthly basis. For rules included in this rule set, see Atomic ModSecurity Rule Sets.
- OWASP ModSecurity Core Rule Set (CRS). The CRS provides generic protection from unknown vulnerabilities often found in web applications. This rule set is shipped for free. It is known as a very restrictive rule set; it requires additional tuning for production use. When this rule set is selected, WordPress partly does not work, webmail and file sharing do not work either. You can use Atomic or Comodo rule sets instead.
- Advanced ModSecurity Rules by Atomicorp. The latest version of the rules, with all the performance enhancements, new security features and bug fixes released by Atomicorp GotRoot on a daily basis. This is a commercial rule set that is fully supported and recommended for production use. Plesk provides the Security Core Complete by Atomicorp extra feature that allows you to enable this rule set in Plesk. You can get this extra feature by the following ways:
- Buy the Advanced ModSecurity Rules by Atomicorp product in the Plesk Online store.
- If you already have a Plesk license, you can add the extra feature via the Plesk Partner Central UI or via the Partner API (for details, refer to the Advanced Administrator’s guide).
- If you have a Plesk license but have no access to the Plesk Partner Central, contact your provider.If you already have an account on the Atomic site, you can provide your username and password to enable this rules set.
- Comodo ModSecurity Rule Set (Linux). This is a simple-to-use, customizable rules-based traffic control system that protects your web-based applications and prevents newly emerging hacking techniques with the use of a frequently updated rules database. This rule set is shipped for free. To enable this rule set in Plesk, register on the Comodo site and provide your username and password from this site.
- Custom. You can upload a custom web application firewall rule set, for example, a trial package from Atomic or a free package from Comodo. Supported formats: zip, tar.gz, tgz, tar.bz2, conf.
4. To automatically update the selected rule set, select the Update rule set checkbox and select the update period.
5. Select a predefined set of parameters or specify your custom ModSecurity directives. You can select the following predefined sets of parameters:
- Fast, when the HTTP request URI and parts of headers are analyzed. This mode is the least CPU consuming.
- Tradeoff, when the HTTP request URI, headers and the request POST data are analyzed. This mode is a good balance between quality and performance.
- Thorough, when the full HTTP request headers, the request POST data and the HTTP response body content are analyzed. This mode consumes the most CPU resources, but it can be recommended for sites that require special security measures. For example, online shops accepting card payments.

Step 10 – Install ImunifyAV for Malware Scan
ImunifyAV – an intelligent antivirus and security monitoring tool for websites with one-click automatic malware cleanup, domains reputation monitoring and blacklist status check.
With ImunifyAV you can:
- Give your customers complete, automated security to combat viruses, adware, spyware, trojans, and worms.
- Reduce support calls from customers blaming you that the website got hacked.
- Recognize dangerous behaviors in real-time and immediate clean up once detected and offer it as an extra on top of your services to your customers.
Features:
- The FREE version includes a fully-featured malware file scanner, reputation and blacklist status monitoring.
- Premium version (ImunifyAV+) enables one-click automatic cleanup, scheduled websites check, admin, and user notifications on malware detection as well as enables user permissions management and introduces User tab with a summary and scanning results. You get a 10% savings with the Plesk license key you sign up from our store.
- Detects any types of malicious files including backdoors, web-shells, viruses, hacker’s tools, ‘blackhat SEO’ scripts, phishing pages and others
- Monitors reputation and blacklist status of domains against 60+ security services including Google SB, Yandex SB, McAfee, ESET, Kaspersky
- Supports WordPress, Joomla!, Magento, Drupal, MODx, Bitrix and other PHP-based CMSs and static HTML websites
- One-click automatic malware cleanup, scheduled & on-demand website scannings and detailed reports
- UI flow optimized for security monitoring of hundreds of users and thousands of domains per server
To install ImunifyAV FREE antivirus for Plesk hosting panels, go to Plesk extension page and download the extension or open Plesk panel admin page and install the extension right from your web hosting panel → Security → ImunifyAV.
Alternatively, you can consider using Imunify360 – an enhanced version with more comprehensive checks and protection for your server. With Imunify360, you will also get KernelCare included for FREE (that usually cost $4/mo retail). KernelCare offers your Linux web server the latest kernel (the Core OS patches) patches as it is released without the need of rebooting your server.
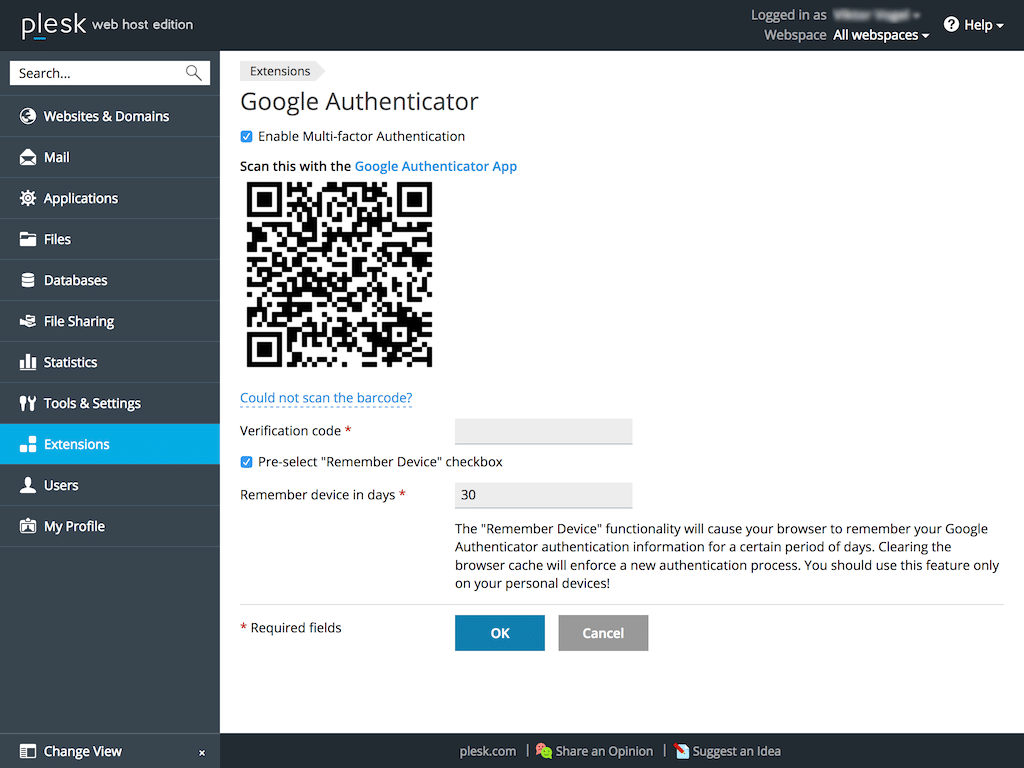
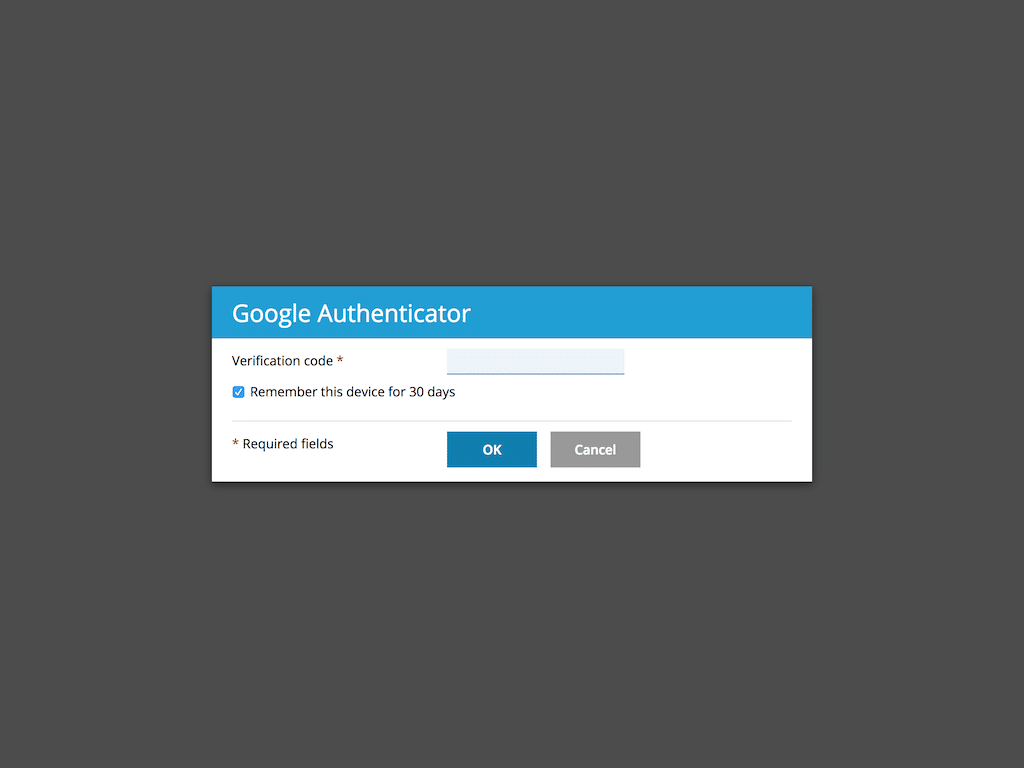
Step 11 – Enable 2FA for your Plesk Admin Login
2FA (2 Factor Authentication) adds an extra layer of login credentials on top of your default Plesk Web Admin password.
We discussed restricting your Plesk Web Admin to IP address on Step 6 and that requires a dedicated IP address for your Internet connection. This may be an issue if you are traveling and you do not have a VPN service. If getting a dedicated IP is not possible, 2FA will give you an option.
What’s needed is you will need to download the Google Authenticator Apps to your mobile and scan the bar code. Each time after you have entered your password, you will need to launch your Google Authenticator Apps on your mobile and key in the 6 digits code before entering your Plesk web admin.
Step 12 – Keep Your Application Up-To-Date
The general rules of thumbs are patch your web application packages or extensions to the latest version as always. Don’t run any outdated application.
Example are if you run any CMS such as WordPress and Joomla on your web server, keep the version including the plugins always up-to-date. Plesk have the WordPress Toolkit (which is available for FREE with Plesk Web Pro and Web Host editions) that allows you to configure the automatic update of the plugins and WordPress cores as updates are available.
Step 13 – Configure Backup for your Plesk Server
Backup, backup, backup.
Always keep a backup for your websites off remote server as for emergency restoration purpose. Do not try to store the backup locally on your server for recovery purpose. This is to prevent incidents when your server is hacked and all the backups are removed together.
Use Backup to CloudPro extension to helps you take care of this. With Backup to CloudPro, you can easily schedule Automatic Backups to the most popular Cloud Storages. Just one activation and it allows you and your customers to set up different backup schedules for Plesk Resellers, Clients, and Subscriptions. The subscription is just only at $3.60/mo when you purchase your Plesk license at our store.
This pack is a common solution for Amazon S3, Google Drive, DropBox, DigitalOcean Spaces, Microsoft OneDrive, a perfect choice for Hosting companies and Web Professionals. You will need a separate subscription for these service providers.
While this 12 simple steps offer some basic ways of keeping the bad guys out from your server door. Security is an on-going process, it is not a set-it-and-forget-it. It’s always recommended for you to review your web server log and keep an eye out on your Plesk server.